You must program the CEID indexes, CEID digits, and Feature DNs into the Cluster Elements forms of each element. In order for features, such as DSS/BLF, Direct Page, and Group Page to function across a cluster of elements, you must assign a unique Feature Directory Number (DN) to each element in the cluster. These features require an element to send the status of one of its devices to another device on a different element. Status messages are sent to a Feature DN on the element that hosts the device, rather than being sent directly to the set. This approach reduces the number of status messages that are sent across the network. Refer to your completed Cluster Element Planning Table when programming the CEID indexes, CEID digits, and Feature DNs.
Note: You cannot use SDS to program the CEID digits and Feature DNs into the Cluster Elements forms. You must log into the System Administration Tool at each cluster element and enter this data in the Cluster Elements forms.
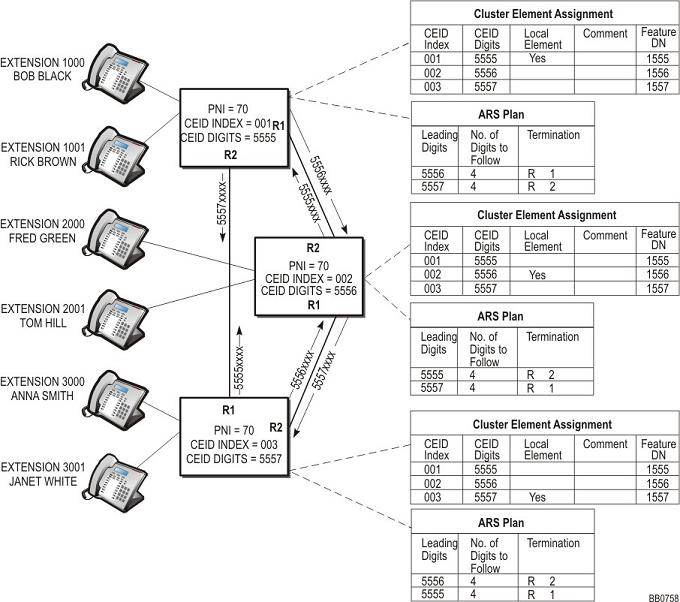
Figure 1: Example of Programming the Cluster Elements Forms
To add the Cluster Elements
Launch the System Administration Tool on one of the cluster elements.
Select the Cluster Elements form.
Click Add Member or select the element and then click Change Member.
Click New if you are adding a new element or click Existing and then select a non-clustered network element from the list.
Enter the name of the cluster element.
Enter a 1- to 3-digit CEID index for this cluster element in the "Cluster Element ID" field. The Cluster Element ID Index must be in the range 1 to 999.
Enter the unique 1- to 7-digit CEID digit string of this cluster element in the adjacent "CEID Digits" column.
Select Yes for "Local". Choosing Yes assigns the CEID digits to the selected element. For each element, you can only assign one CEID entry as the local entry. When you commit the form, this CEID digit string will be added to the element's numbering plan.
Enter a description (up to 20 characters in length) for this element in the "Comment" field. This entry is optional.
Enter the unique CEID index and the unique CEID digit string for each remote cluster element. Set "Local" to No. The CEID digits of remote cluster elements must translate to an ARS route, list or plan with identical leading digits.
Enter a description for each remote cluster element in the "Comment" field.
In the Feature DN field, enter a directory number that is one to seven digits in length. The directory number must be unique within the cluster and the length must match the extension number length. Do not include any * or # symbols in this number. This number allows DPNSS features such as busy lamp field messaging, direct paging, group page, and call pickup to function across the cluster.
Assign the local element with a Feature DN
Assign a unique Feature DN to each remote element. The Feature DN that you enter for a remote element must match the remote element's Feature DN.
We recommend that you set each local Feature DN similar to its element's CEID digits. For example, if the local CEID is 5555, and your cluster uses 4-digit extension numbers, set the Feature DN for that element to 1555. Then if you have to debug trace messages across the cluster, it will be easier to identify the messages.
Click Save.
Repeat the above procedure for each cluster element.
Proceed to Program Each Cluster Element with Same PNI.
Notes:
The entries in the "CEID Index" columns and the "CEID Digits" columns in the Cluster Elements form of each cluster element should be identical with the columns in the other cluster elements. Only the "Local Element" column should be programmed differently to indicate which CEID digit string is associated with the local cluster element. The optional text fields can also be different.
If you program a remote device with a valid but incorrect CEID digit string in the Remote Directory Numbers form of a cluster element, call processing errors will occur. A call originating from the cluster element to the remote device either takes a convoluted route to the device, or is passed between the cluster elements until it is terminated by loop avoidance.
